This is the second part of the article that explains the Document Action Panel in VIENNA Advantage DMS. We suggest to check the first part of this article before you continue reading this one: What can you do with the Document Action Panel in VIENNA Advantage DMS? [1/2]?
SUGGESTION!
This is the 6th article of a series of articles related to our Document Management System. You can check the previous articles about VIENNA Advantage Document Management Solution in this list: Document Management Tips
Document Action Panel
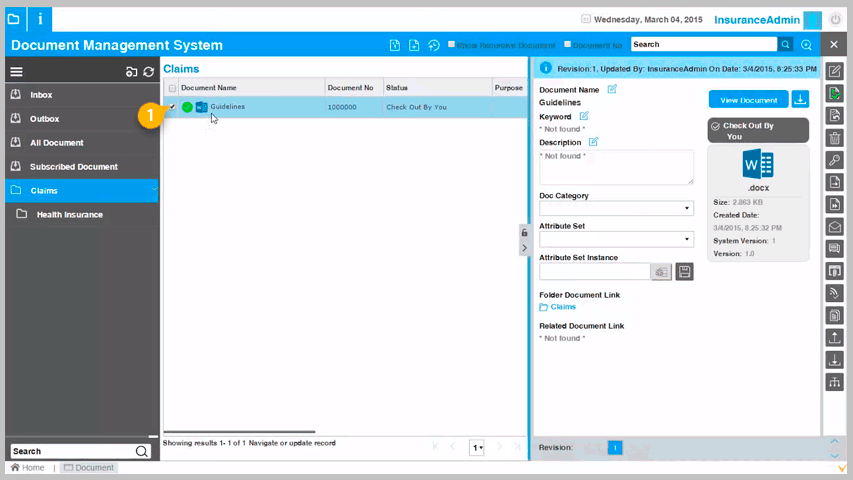
The Document Action Panel is the place that enables you to add, view, edit and manage the documents. It is located in the right upper side of the DMS module window. This panel contains different action buttons which are used for management of the selected document. In this article we will showcase the last 9 buttons. To learn more about the first 7 buttons of the document action panel please click here.
Button #8: Send E-mail
This option is used to send a document through e-mail directly from VIENNA Advantage DMS system. The DMS system allows users to send a document through mail to any Mail ID. This functionality is working if the email settings are completed.
To send a document through e-mail follow this steps:
[1] Click on the “Send Email” button in the document action panel. A new window will open as shows in the picture below.

[2] The user needs to enter the Email address of the recipient (in case of more than one recipient, the user needs to mark the others in CC or BCC).
[3] The user can add one or more attachments by clicking on the attachment icon. After clicking on the attachment icon a new window will open. Select the document you want to upload and click on the “Open” button. The document will be attached in the e-mail.
[4] Users need to enter an e-mail “Subject” and can also add a content in the e-mail and manage font size, type, format and color.
[5] Click on the “Send Email” button available on the top-right side in the mail window. After clicking the send button, the DMS system shows the following pop up message: “Do you want to run the process in background” click on the “OK” button. Email process will run in background, the e-mail will be sent.
Button #9: Chat Window
The “Chat function” is a mode of communication between users within the DMS system. User can tag a chat note on any document in the DMS system. Chat functionality can be accessed on any document permission level except “None”. It allows user to put a comment for any document which than can be viewed by all other users who have a permission to view that document. Other users can also write their comments in the same chat window.
To start the chat follow this steps:
[1] Click on the “Chat” button in the document action panel. A new window will open as shows in picture below.
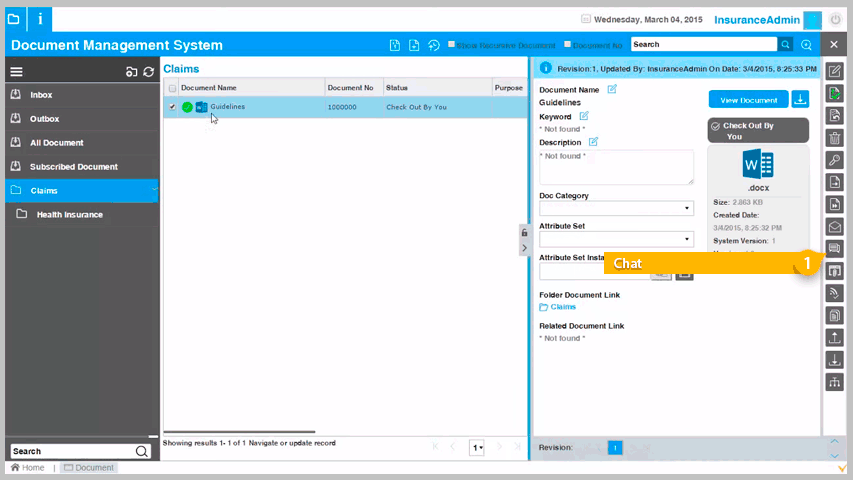
[2] User can add the chat message by entering the value in the chat field.
[3] After you finish typing the message, click on the “OK” button. The message will be reflected in the chat window. Comments from other users will be also visible in the chat window above and below your comment.
Note: Once user add comment in the chat window, user can not delete that content. It can only be deleted if the user deletes the version of the document or deletes the document.
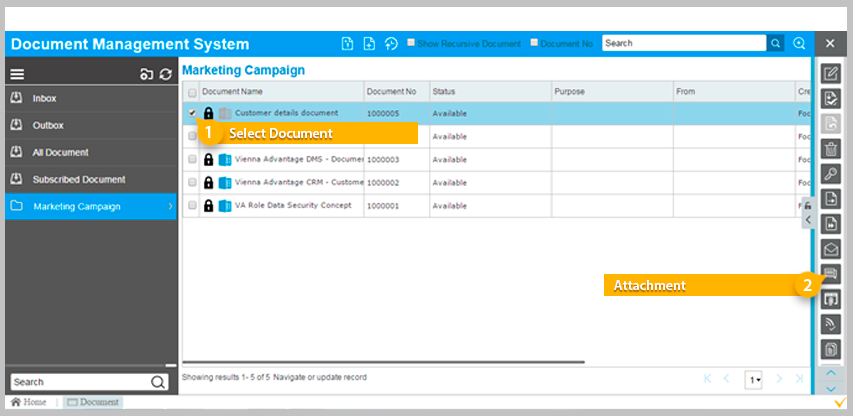
Button #10: Attachment
This button is used to attach documents with various windows in VIENNA Advantage. Every window of VIENNA Advantage contains options “Attach document from” and “View document”. Only single documents can be attached to a window at one time. When you select multiple documents then “Attach to” button becomes disable.
To showcase how this button is used we will take a look at the following example: Let us imagine that user has details of some customer, placed in a DMS document. The user wants to attach this document with the Customer Master Window.
To attach a document follow this steps:
[1] Select the document (E.g. Customer details document)
[2] Click in the “Attach To” button as shown on the picture below
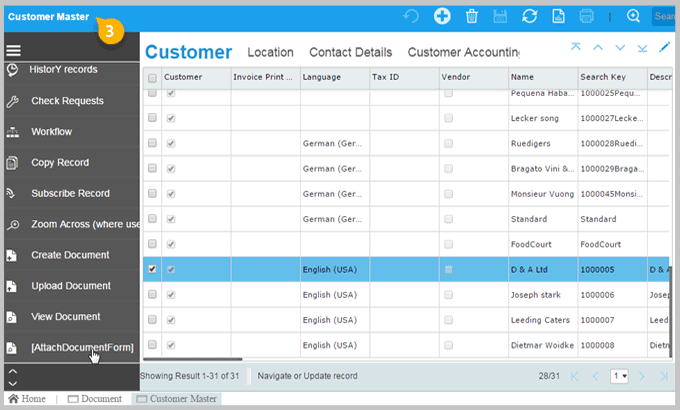
[3] After click on the “Attachment” button in the document action panel, open the Customer Master Window
[4] Select any record from the window to which you want to attach the document to
[5] Click on the “AttachDocumentFrom” button, from the document section of the left menu panel. After clicking on the “AttchDocumentForm” the selected document will be attached with the window record.
Button #11: Subscribe/Unsubscribe Document
The main function of this button is notifying users about any change in the document (document versions). When you subscribes to some document, you will be notifyed each time someone makes a change in the document. Once you “subscribe” to a specific document, the button in the document action panel will automatically change to “unsubscribe”.
Subscribe document action does not depend upon user permissions. Even if a user has only a read permission, he/she can subscribe to document. Read more about user permissions and roles in the Document Access section.
Subscribe Document:
To subscribe select the document and click on the Subscribe action button.Once the document is subscribed, the button automatically will change to unsubscribe.
Unsubscribe Document:
You can unsubscribe only from a subscribed documents. To unsubscribe, select the document and click on the unsubscribe action button.
Button #12: Copy Document
This button is used to copy a document from one to another folder. Copy Document function allows users to create a copy of existing document or newly uploaded document. User can create a copy of a document with new version and inherit all properties of the original version. Copied documents have different document number and new version. Users can not copy a document to Inbox and Outbox.
To copy a document follow this steps:
[1] Select a document
[2] Click on the “Copy Document” button in the document action panel
[3] New pop up window will open with the following fields:
- Document Name: Enter document name different from original one
- Folder Name: Choose existing folder where user want save the copy of the document.
- Document Category: Choose document category. These categories can be manually created via Category Window.
- Keep Checkout: By ticking this check box you can copy the document in “check out” state, otherwise it will be created as in “check in” state always.
Button #13: Upload Document
Upload Document functionality allows user to attach a new document to an existing document in the DMS system. This action is enabled when document has a “check out” status. After you upload a new document with this functionality, it will create a new version of the existing document, containing the new file. The previous version of the document will contain the old document file.
To upload a document follow this steps:
[1] Select the document
[2] Click on the “Upload” button in the document action panel
[3] A new pop up window will open from where you can select the document you want to upload. Select the document from the list and click on the ‘Open’ button.
[4] A pop up message will be displayed with the following message “Record Saved”. Click “OK” button.
Button #14: Download Document
Use the “Download Document” button from the document action panel, when you want to download a selected document from the DMS system. You can download and save the document in your local system drive.
Button #15: Workflow
Workflow is defined as a step-by-step activity to complete a task that involves both the people and the system. By clicking on the “Workflow” button in the document action panel, users can view the workflow process and activities asociated with the selected document.
To view the workflow process and activities of a document follow this steps:
[1] Select a document
[2] Click on the “Workflow” button in the ducument action panel
[3] A new window will open containing 3 tabs: Process, Activity and Event. See picture below.

Process tab: In the process tab users can check the details of workflow like: workflow name, document creation date, workflow status, name of the workflow responsible, table name and text message. Users can abort the workflow, assign this workflow to other user and select new responsible for this workflow.
Activity Tab: In the activity tab users will see a list of activity related to the selected workflow. Activity tab shows all details regarding completed and pending activities.
Event Tab: In this tab users will see a list of total number of events related to the selected workflow. Event tab provides details of total number of completed and pending events.

Would you like to read more articles related to VIENNA Advantage Document Management System?
Check our Blog category: Document Management Tips


One thought on “[2/2] What can you do with the Document Action Panel in VIENNA Advantage DMS?”